Storyboards and programmatic iOS development: part 2
Welcome back to my three-part series covering storyboards and programmatic iOS developement.
This is part two in the series, and if you missed part one, I recommend you check it out here before continuing with this post.
In part one, we were briefly introduced to two of the several approaches to developing an iOS app: storyboards and programmatically. Then, we jumped straight into building a sample app simulating a login form using a storyboard.
In this post, we'll build the same app entirely in code, which means we won't be using storyboards at all.
Project setup
Let's jump right in and begin building our sample app.
Once again, we're going to create an Xcode project. Give it a different name, but otherwise, the other fields should stay the same as the storyboard project.
This means the Interface drop-down should say "Storyboard", Life Cycle should be set to "UIKit App Delegate", and Language should be "Swift." The two checkboxes at the end should remain unchecked as well.
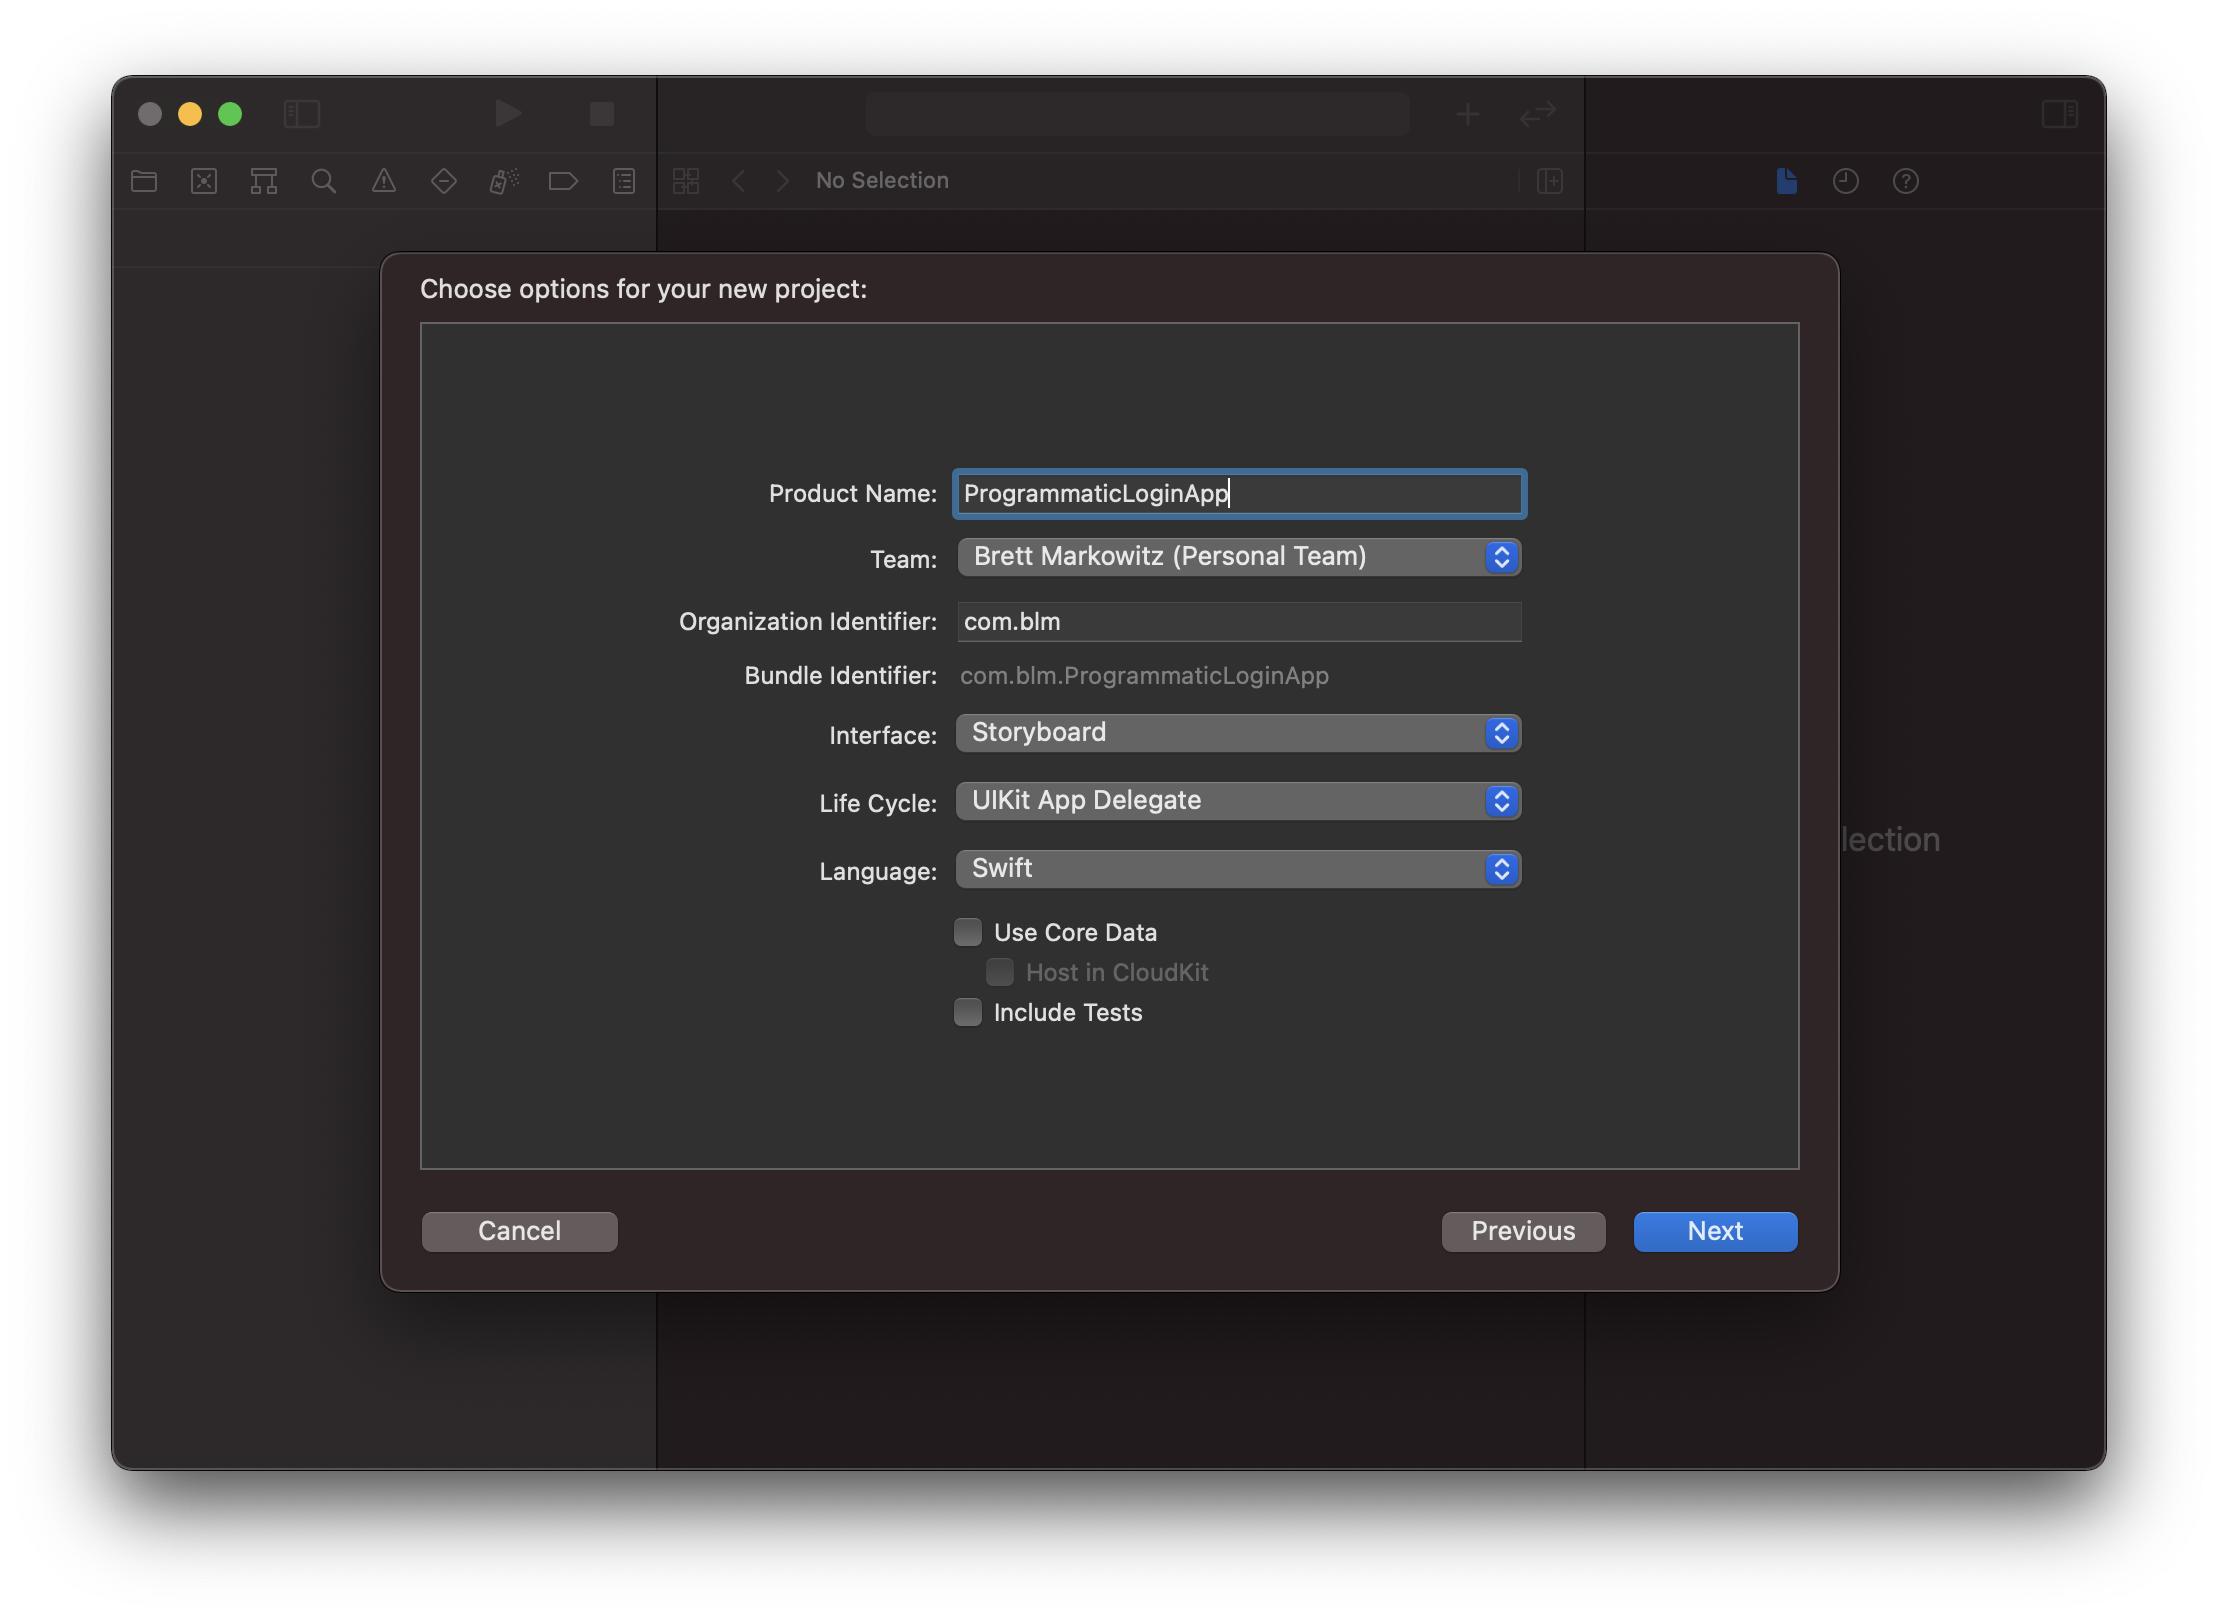
The reason why we need to select "Storyboard" for the Interface drop-down is because Apple doesn't explicitly provide us a way to not use storyboards (without using SwiftUI, of course). As a result, we need to simply tell it we want to use storyboards and then go in and do some manual setup to remove storyboards from the project.
Click next and choose a location for your project to finish creating it.
Removing the storyboard
When we tell Xcode to use storyboards for our project, there are a few things that it does for us to make this happen.
The first and easiest thing we can do is to delete the Main.storyboard file that Xcode provides us. Right-click it in the sidebar and choose "Move to Trash."
The next thing we need to do is go into the very top level item of the Project Navigator: the blue icon with the app name next to it. Click it and you'll see is open in the editor.
This is the .xcodeproj file which has two main sections to it, Project and Targets. The Targets section lists out one or more targets that our app has. For example, we have one target already, which is our iOS app. In the future, we may decide that we want our app to support the Apple Watch, so we'd need another target for that, and so on.
If you click into our only target, the iOS app target, a bunch of settings will appear, such as our app version, the minimum iOS version the app supports, and more.
A little further down, within the Deployment Info section, there's a text field labeled "Main Interface" and it's currently set to "Main," the name of the storyboard file we just deleted. Click into the field, get rid of "Main" so that it's just blank, and hit enter.
The last thing we need to do is head into the Info.plist file in the sidebar. plist is short for "property list", and Apple describes it as a place to "store configuration data in a place where the system can easily access it."
New in iPadOS 13 is the ability for apps to have multiple windows open at once, so inside the info.plist, Xcode has some configuration items to allow for this, including a reference to the Main.storyboard file. We'll need to remove it by expanding the following items:
Application Scene Manifest > Scene Configuration > Application Session Role > Item 0
Inside there, you'll see an item labeled "Storyboard Name." Click that line and press the backspace key to remove it. Now, if you click the play button at the top to run the app in the simulator, you should see a completely black screen once it loads up.
Setting up the sample app programmatically
By clearing and deleting those items, what we essentially did was undo the things Xcode hooked up for us to create an initial window for our app. Since we're not going to be using storyboards, we'll need to wire that back up using code instead.
To do this, we'll need to write some code in SceneDelegate.swift. This file - and the SceneDelegate class inside of it - was created by Xcode when we created the project. You might've seen a property for it near where we deleted the "Storyboard Name" property in the info.plist.
Before iOS and iPadOS 13, there was only an AppDelegate. It was a class containing several methods that iOS would call where you could handle various system events, like the app finishing launching or entering the background, for example. It also used to be the place where we'd set up the initial window and view controller if we weren't using storyboards.
When iPadOS 13 launched with support for having multiple app windows visible at once, instead of adding more methods into the AppDelegate class to handle this functionality, Apple decided to create a new delegate object called SceneDelegate and expose the functionality there.
So, this is where we'll set up our initial window.
The method inside SceneDelegate.swift that we care about is the very first one:
func scene(_ scene: UIScene, willConnectTo session: UISceneSession, options connectionOptions: UIScene.ConnectionOptions) {
    // Use this method to optionally configure and attach the UIWindow `window` to the provided UIWindowScene `scene`.
    // If using a storyboard, the `window` property will automatically be initialized and attached to the scene.
    // This delegate does not imply the connecting scene or session are new (see `application:configurationForConnectingSceneSession` instead).
    guard let _ = (scene as? UIWindowScene) else { return }
}
The comments that are in the function by default are pretty helpful too. Apple tells us that we should use this method to create an instance of a UIWindow using the UIScene object that the system provides to us whenever it calls this method.
They also tell us that putting any code in this method at all is optional, because iOS will handle this setup for us if we're using storyboards.
To set up the window and make our app appear properly on the screen, we need to do - at a minimum - three things.
- Like Apple tells us in the comments that they provide, we need to initialize the
windowproperty of theSceneDelegateusing the providedscene. Remember, iOS calls these methods on its own and passes in the parameters on its own as well, so we don't need to worry about when and where to invoke them. And to make this step easier, Apple provides a UIWindow initializer which takes a UIScene object. - We need to set a root view controller for the window. This is the first view controller that will appear when the window loads. In our case, we want the view controller with our three two fields and login button to be the first thing to show up.
- Finally, we need to tell the window to make itself visible.
Here's an updated version of the function:
func scene(_ scene: UIScene, willConnectTo session: UISceneSession, options connectionOptions: UIScene.ConnectionOptions) {
    // Use this method to optionally configure and attach the UIWindow `window` to the provided UIWindowScene `scene`.
    // If using a storyboard, the `window` property will automatically be initialized and attached to the scene.
    // This delegate does not imply the connecting scene or session are new (see `application:configurationForConnectingSceneSession` instead).
    guard let windowScene = (scene as? UIWindowScene) else { return }

    // 1. Intialize the `window` property with a UIWindow object using the provided UIScene object
    window = UIWindow(windowScene: windowScene)

    // 2. Set our windows root view controller to a new instance of our ViewController class, which lives in `ViewController.swift`
    window?.rootViewController = ViewController()

    // 3. Tell our window to make itself the key window and visible
    window?.makeKeyAndVisible()
}
One thing to note is we needed to slightly modify the guard let statement to replace the underscore with a variable name so that we can use the UIWindowScene in the remaining code. The function originally accepted scene as a UIScene, but the UIWindow initializer needs a UIWindowScene, so the free line of code Apple provides us does that for us, except the underscore was just throwing the result away rather than storing it, since it's not needed when a storyboard is used for the app's initial view controller.
If you build and run your app now, you'll notice that it's still just a black screen. But why is that?
If we open ViewController.swift, we'll see that there's nothing there.
import UIKit

class ViewController: UIViewController {

    override func viewDidLoad() {
        super.viewDidLoad()
        // Do any additional setup after loading the view.
    }
}
There's a function there by default, but it doesn't really do anything other than call some logic that belongs to its superclass. We have no elements, no colors, nothing, so all we'll get is a black screen.
We can write one quick line of code to change that. Add this inside viewDidLoad(), just below the comment that's there...
view.backgroundColor = .systemBackground
... and run the app again. Now, we'll have a white background, and at this point, we're essentially at the place we would've been had we stuck with storyboards and simply ran the empty app.
Adding the text fields and button
Now that we have our app window set up and our view controller appearing properly, we can begin adding our username and password text fields and login button.
Let's start with the username text field.
If you remember back to the storyboard example app, to connect our elements to the code, we dragged a line from our storyboard to the top of the ViewController class and Xcode inserted a line of code for us. It looked something like this:
@IBOutlet var usernameTextField: UITextField!
We also said that the @IBOutlet annotation told Xcode and iOS that this element is connected to an element in the storyboard.
Since we're no longer dealing with storyboards, we can omit that annotation, leaving us with this:
private var usernameTextField: UITextField!
This is exactly the line of code we'll need in our app. As a quick refresher, what we're saying here is that we are creating a variable named usernameTextField and it will hold an object of type UITextField... exclamation point. By using the exclamation point - or implicity unwrapped optional - syntax, we are telling iOS (when the app is running) that this variable will definitely have a value in it when we try to use it. If it doesn't, our app will crash.
This is fine for our simple example app because we can guarantee that when we go to modify or otherwise access our button in code, it will have a value. If it doesn't, we did something wrong and should fix it.
We can go ahead and declare two more variables for our password text field and our login button. Make sure you're placing these within the ViewController class, but outside of the viewDidLoad() function, preferrably right above that.
private var passwordTextField: UITextField!
private var loginButton: UIButton!
Two things to note here.
- We are only declaring our variables here, not initializing them. These variables are just empty boxes right now, they don't have any values assigned to them yet and they won't appear in our app yet either. We're simply typing out what we know we're going to need, then we can initialize them with actual UITextField objects and an actual UIButton object.
- The
privatekeyword isn't too important in this sample app, but it's good to get into a habit of thinking about who and what should be able to access the various properties of your classes. If we had other view controllers in this app, should they really be directly accessing our username text field, or would we be better off exposing apublicmethod from this view controller so that others can use it to do what we all them to?
Now, let's go and actually create our objects and configure them, and to do that, we'll create a separate function for each object's configuration logic.
Let's start with our username text field. Go ahead and add a function just below the closing curly brace of viewDidLoad().
private func configureUsernameTextField() {

}
There's several things we need to do in this fuction and the subsequent configuration methods. Let's list them out and then implement them one by one.
- Initialize our views. We have our variables declared (what we just did) but now we need to give them actual values.
- Set the
translatesAutoresizingMaskIntoConstraintsproperty of our view tofalse. If you're interested in a good, in-depth explanation was to why we need to set this property tofalse, I suggest you check out this article. Essentially, it needs to be set tofalsein order for us to create our constraints properly. This is another example of something that Xcode handled for us when we used storyboards. - Set any special properties on our views. For example, in the storyboard version of our app, we set the content mode of the username field to be "Username" and the placeholder value to "Username" as well. We can do those directly in code as well.
- Add the view to our view controller's view. This is key, because if we don't do this, our views won't appear at all.
- Activate the constraints for the view. This will position our views where we want them on the screen.
Here's how those things will look for the username text field configuration method:
private func configureUsernameTextField() {
    //1. Initialize our view
    usernameTextField = UITextField()

    //2. Set the translatesAutoresizingMaskIntoConstraints property to false
    usernameTextField.translatesAutoresizingMaskIntoConstraints = false

    //3. Set any additional properties to customize our view
    usernameTextField.borderStyle = .roundedRect
    usernameTextField.placeholder = "Username"
    usernameTextField.textContentType = .username

    //4. Add the view to the view controller's view
    view.addSubview(usernameTextField)

    //5. Activate the constraints to lay out our view
    NSLayoutConstraint.activate([
        usernameTextField.topAnchor.constraint(equalTo: view.safeAreaLayoutGuide.topAnchor, constant: 200),
        usernameTextField.leadingAnchor.constraint(equalTo: view.safeAreaLayoutGuide.leadingAnchor, constant: 25),
        usernameTextField.trailingAnchor.constraint(equalTo: view.safeAreaLayoutGuide.trailingAnchor, constant: -25)
    ])
}
Now, this code won't do a single thing until we call it, so we need to add it to our viewDidLoad() method, which should now look like this:
override func viewDidLoad() {
    super.viewDidLoad()
    // Do any additional setup after loading the view.
    view.backgroundColor = .systemBackground

    configureUsernameTextField()
}
When you run the app now, you'll see the username text field there, right where we want it.
Next, we'll do essentially the same things, except we'll be doing it for the password text field instead, which will have slightly different constraints to get it to be underneath the username text field. We'll follow the same 5 general steps from above.
private func configurePasswordTextField() {
    //1. Initialize our view
    passwordTextField = UITextField()

    //2. Set the translatesAutoresizingMaskIntoConstraints property to false
    passwordTextField.translatesAutoresizingMaskIntoConstraints = false

    //3. Set any additional properties to customize our view
    passwordTextField.borderStyle = .roundedRect
    passwordTextField.placeholder = "Password"
    passwordTextField.textContentType = .password

    //4. Add the view to the view controller's view
    view.addSubview(passwordTextField)

    //5. Activate the constraints to lay out our view
    NSLayoutConstraint.activate([
        passwordTextField.topAnchor.constraint(equalTo: usernameTextField.bottomAnchor, constant: 20),
        passwordTextField.leadingAnchor.constraint(equalTo: view.safeAreaLayoutGuide.leadingAnchor, constant: 25),
        passwordTextField.trailingAnchor.constraint(equalTo: view.safeAreaLayoutGuide.trailingAnchor, constant: -25)
    ])
}
Again, we'll want to make sure we call this new method from our viewDidLoad() method, so that the configuration happens when the view loads.
override func viewDidLoad() {
    super.viewDidLoad()
    // Do any additional setup after loading the view.
    view.backgroundColor = .systemBackground

    configureUsernameTextField()
    configurePasswordTextField()
}
Run the app and you should see the password text field sitting beneath the username text field, which is what we want.
The final view configuration we have to do is for the login button, and again, the process is going to be mostly the same as the two methods we just wrote.
private func configureLoginButton() {
    //1. Initialize our view
    loginButton = UIButton(type: .system)

    //2. Set the translatesAutoresizingMaskIntoConstraints property to false
    loginButton.translatesAutoresizingMaskIntoConstraints = false

    //3. Set any additional properties to customize our view
    loginButton.setTitle("Log in", for: .normal)
    loginButton.addTarget(self, action: #selector(loginButtonPressed), for: .touchUpInside)

    //4. Add the view to the view controller's view
    view.addSubview(loginButton)

    //5. Activate the constraints to lay out our view
    NSLayoutConstraint.activate([
        loginButton.topAnchor.constraint(equalTo: passwordTextField.bottomAnchor, constant: 20),
        loginButton.leadingAnchor.constraint(equalTo: view.safeAreaLayoutGuide.leadingAnchor, constant: 25),
        loginButton.trailingAnchor.constraint(equalTo: view.safeAreaLayoutGuide.trailingAnchor, constant: -25),
        loginButton.bottomAnchor.constraint(lessThanOrEqualTo: view.safeAreaLayoutGuide.bottomAnchor)
    ])
}
The one thing that's significantly different in this method compared to the other 2 is the call to addTarget(). This is a function available on the UIControl base class in UIKit, and it allows you to attach a method to a view, like a button or a switch, that will be called when it's interacted with.
In this case, we want to do something when our button is tapped, so we add a target for the button's touchUpInside event, which is essentially a normal tap that you're used to.
The other two parts of the addTarget() call are:
- The target. This is essentially the object that contains the method you want to be called when the action occurs. In this case, we're going to put the method we want called into the same object where we're calling
addTarget(), so we can just sayself, meaning "the class we're currently inside." - The selector. This is a bit of a relic in that it has its origins in Objective-C. You don't have to know a ton of what it means or how it works (you can find a little more info here from Paul Hudson's Hacking With Swift), but basically the syntax consists of two parts:
#selector(method name goes here)and an@objcannotation in front of thefunckeyword of the method you want to be called, which you'll see next.
Be sure to call configureLoginButton() in viewDidLoad() so our code will actually run. Then, run the app and you should see the username text field, password text field, and login button aligned properly.
When it comes to the constraints, they're exactly the same as the storyboard version, except we're explicitly writing them out. Remember the chain analogy from part 1; the constraints "start" with the username text field being anchored to the top of the view.
Then, password text field's top edge is anchored to the bottom of the username text field's bottom edge, continuing the chain. Finally, the button's top edge is anchored to the bottom edge of the password text field and to the bottom of the view, completing the chain.
Each of the views also has leading and trailing constraints to ensure they have a width and are a certain amount of space away from the sides of the view.
If you're still struggling with the constraints, that's ok. It's not the most intuitive thing when you're first learning and even when you do start to understand it a little bit, you'll likely still run into problems as it never ends up being as straightforward in reality as it seems in your head.
Now, we can work on the actual logic to make our app do something when the login button is tapped. The logic for the login button is going to be exactly the same as in part 1. We need to get the current values from the text fields, compare them to the correct username and password, then present an alert with text telling the user if their credentials were correct or not. The alert should include an OK button that allows the user to dismiss it.
@objc func loginButtonPressed() {
    let typedUsername = usernameTextField.text
    let typedPassword = passwordTextField.text

    var alertTitle = ""
    var alertMessage = ""

    if typedUsername == correctUsername && typedPassword == correctPassword {
        // Credentials are correct
        alertTitle = "Success"
        alertMessage = "The credentials are correct."
    } else {
        // Credentials are incorrect
        alertTitle = "Error"
        alertMessage = "The credentials are incorrect."
    }

    // 1. Create the error alert
    let alertController = UIAlertController(title: alertTitle, message: alertMessage, preferredStyle: .alert)

    // 2. Create an "OK" action
    let okAction = UIAlertAction(title: "OK", style: .default, handler: { _ in
        self.dismiss(animated: true, completion: nil)
    })

    // 3. Add the action to the alert
    alertController.addAction(okAction)

    // 4. Show the alert
    present(alertController, animated: true, completion: nil)
}
Here, you can see the @objc annotation that I just mentioned. This is what allows this function to be used in the #selector() syntax. If you forget the @objc annotation, Xcode will let you know.
You'll also notice we have a couple of errors here, and that's because we never defined our correctUsername and correctPassword. We can do this at the top of the class, below our views:
var usernameTextField: UITextField!
var passwordTextField: UITextField!
var loginButton: UIButton!

var correctUsername = "user1"
var correctPassword = "testpassword"
If you run the app now, everything should work just as it did in the storyboard version from part 1. We can type into the text fields and attempt to log in, and it won't work until you provide the correct username and password.
That'll do it for part 2 of this series. So far, we've built the exact same app, first using storyboards and then again programmatically. In the final part of the series, we'll go over some final points, including some key differences between the two approaches.
You can find the completed project from this post here.